 Pin it
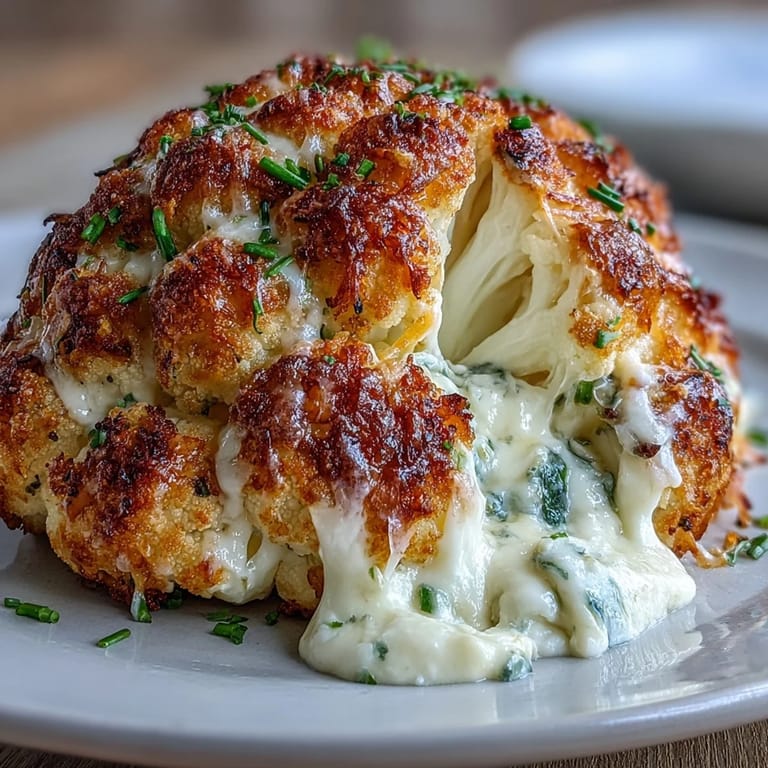
 There's something about presenting a whole roasted cauliflower at the table that makes everyone pause. I discovered this dish accidentally when a friend challenged me to make something vegetarian that wouldn't feel like a compromise, and what started as an experiment became the centerpiece of dinner that night. The golden, bubbling cheese spilling out from the florets felt almost too beautiful to cut into, yet that first bite—creamy, savory, with the cauliflower still holding its gentle sweetness—made it clear this wasn't just vegetables dressed up. Now I make it whenever I want to surprise people, and the reaction never gets old.
I served this to my sister's family on a crisp October evening, and her youngest asked for seconds before finishing the first slice, which had never happened with any vegetable dish before. The kitchen smelled incredible as it roasted—toasted cheese and caramelizing cauliflower mixing with that warm spice from the paprika. My brother-in-law, not typically a cauliflower person, quietly went back for more, and by the end of dinner, there wasn't a piece left. It became the dish they ask me to bring to family gatherings now.
Ingredients
- 1 large whole cauliflower (about 1 kg), leaves and stem trimmed but intact: Look for a head that's tightly formed with no brown spots, and keep the base sturdy so it can stand upright while roasting.
- 1 tbsp olive oil: This brushes the outside and helps the cauliflower develop those golden, slightly caramelized edges.
- ½ tsp salt and ¼ tsp black pepper: Simple seasoning for the exterior that lets the cheese filling shine.
- 150 g cream cheese, softened: The foundation of your filling—soften it at room temperature so it blends smoothly without lumps.
- 100 g shredded mozzarella cheese: This gives the filling stretch and a mild, creamy texture that plays well with the other cheeses.
- 50 g grated Parmesan cheese: The umami backbone that makes people lean in closer with each bite.
- 2 tbsp chopped fresh chives: A bright, onion-forward note that keeps the filling from feeling one-dimensional.
- 1 garlic clove, minced: Just enough to whisper its presence without overpowering the delicate cheese balance.
- ½ tsp smoked paprika: This is the secret everyone asks about—it adds warmth and subtle smokiness that transforms the filling into something complex.
- ¼ tsp ground nutmeg: A pinch of this spice brings an unexpected richness that makes the cheese taste even more indulgent.
- 1 tbsp milk: Loosens the filling just enough so it spreads through the cauliflower without being watery.
- 50 g shredded cheddar cheese: This tops the whole head and browns beautifully, adding a crispy, golden finish.
- 2 tbsp breadcrumbs (gluten-free if needed): Mixed with the topping, these toast up and give the dish textural contrast.
- 1 tbsp melted butter: Tossed with the topping to help it brown and crisp perfectly.
Tired of Takeout? 🥡
Get 10 meals you can make faster than delivery arrives. Seriously.
One email. No spam. Unsubscribe anytime.
Instructions
- Heat your oven and prepare your space:
- Set the oven to 200°C (400°F) and line a baking tray with parchment paper—this prevents sticking and makes cleanup effortless.
- Trim the cauliflower carefully:
- Remove the outer leaves and trim the base flat so the head sits upright on the tray without rolling. Keep the florets intact so the whole shape holds together.
- Parboil for tenderness:
- Boil the cauliflower in salted water for 8–10 minutes until it's just softened but still firm enough to handle. This head start means the final roasting time is shorter and the interior becomes creamy while the exterior crisps.
- Make your cheese filling:
- Blend the softened cream cheese, mozzarella, Parmesan, chives, garlic, smoked paprika, nutmeg, and milk until it's smooth and spreadable. Taste it and adjust seasoning if needed—this is where your filling gets its personality.
- Stuff the cooled cauliflower:
- Using a small, sharp knife, make deep cuts between the florets and into the base, creating pockets without cutting all the way through. Use a spoon or your fingers to press the cheese mixture into every gap, working it down toward the center.
- Season and brush the exterior:
- Brush the outside generously with olive oil and sprinkle with salt and pepper. This outer layer will toast and caramelize as it roasts.
- Make the topping:
- Toss the shredded cheddar with breadcrumbs and melted butter until it looks like wet sand. Sprinkle this mixture evenly over the top and sides of the stuffed cauliflower.
- Roast until golden:
- Bake for 40–45 minutes, watching until the top is golden brown and bubbling, and a knife pierces the cauliflower easily. The kitchen will smell incredible by the last 10 minutes.
- Rest before serving:
- Let it sit for 5 minutes so the cheese sets slightly, then slice into wedges like you would a cake. Serve immediately while the inside is still creamy and warm.
 Pin it
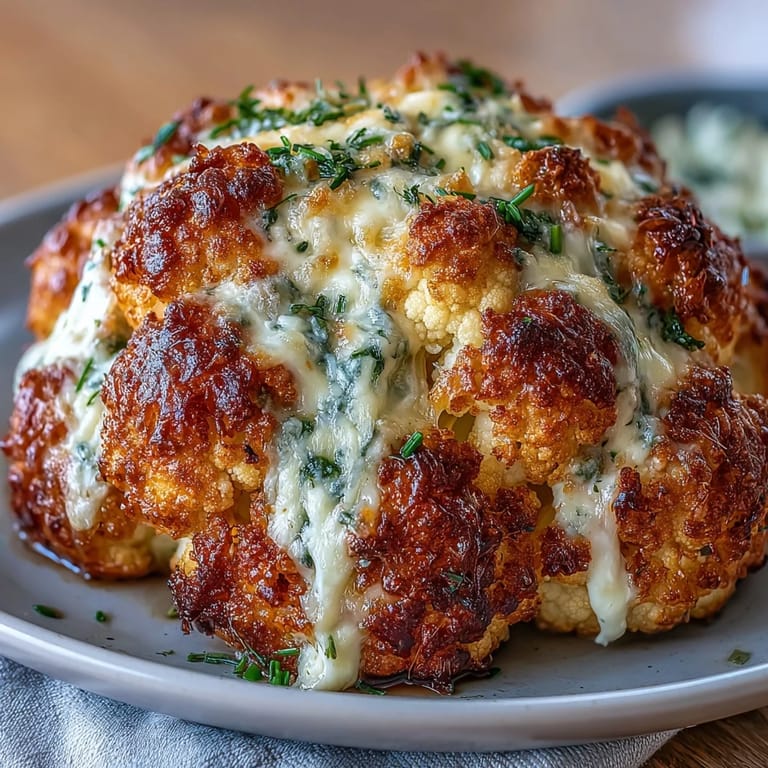
 What strikes me most about this dish is how it transforms a simple vegetable into something that feels almost ceremonial. When you carry that golden, steaming cauliflower to the table and slice into it at the center, watching the cheese spill out, there's a moment where everyone realizes this wasn't a last-minute decision or a side thought—it was made with intention.
Variations and Flavor Swaps
This recipe is forgiving in ways that encourage experimentation. I've added sun-dried tomatoes folded into the cheese filling, which brings a sweet-salty earthiness that pairs beautifully with the nutmeg. Sautéed mushrooms work equally well if you want something earthier, and swapping the chives for fresh dill gives it a lighter, herbal twist that feels almost Scandinavian. Some nights I use cheddar in the filling instead of mozzarella for extra sharpness, or add a small pinch of cayenne if I want a subtle heat creeping in at the end.
What to Serve Alongside
This dish is rich enough to stand alone as a main course, but it comes alive next to something bright and fresh. A crisp green salad with a sharp vinaigrette cuts through the creamy richness beautifully, as does a simple arugula salad with lemon and olive oil. Roasted root vegetables like beets or sweet potato add earthiness without competing, and if you're serving it as a side to something heavier, a light tomato salad keeps the plate balanced and interesting.
Make-Ahead and Storage Tips
You can prepare this almost entirely in advance, which makes it perfect for entertaining when you want to focus on other dishes or conversation. The cheese filling keeps in the refrigerator for two days, and you can stuff the parboiled cauliflower hours before roasting—just cover it loosely so it doesn't dry out. Leftovers reheat gently in a low oven and taste wonderful cold as well, perfect for lunch the next day when you might slice it and eat it almost like a vegetable cake.
- Prepare the filling and stuff the cauliflower up to 8 hours ahead, then roast just before serving for the creamiest center and crispiest top.
- Leftover slices keep in an airtight container for three days and can be reheated at 160°C for 15 minutes without drying out.
- This dish freezes reasonably well if wrapped tightly, though the texture becomes slightly softer—thaw completely before reheating.
 Pin it
 This recipe taught me that sometimes the most impressive dishes come from simple ingredients treated with care and attention. There's no pretense here, just good cheese, good vegetables, and a little bit of warmth that brings them together into something people remember.
Recipe FAQs
- → How do I know when the cauliflower is done?
The cauliflower is ready when it's golden brown on top, the cheese is bubbling, and a knife inserted into the center meets no resistance.
- → Can I make this ahead?
You can prepare the cheese filling and blanch the cauliflower a day ahead. Store separately in the refrigerator, then assemble and bake when ready to serve.
- → What other cheeses work well?
Gruyère, fontina, or aged cheddar add excellent flavor. For a lighter version, try substituting part of the cream cheese with Greek yogurt.
- → Is this suitable for freezing?
It's best enjoyed fresh. However, you can freeze the stuffed, uncooked cauliflower for up to a month. Thaw completely before baking.
- → What should I serve alongside?
A crisp green salad with vinaigrette balances the richness. Roasted vegetables or crusty bread also make excellent accompaniments.
- → Can I grill this instead?
Yes, wrap the stuffed cauliflower in foil and grill over medium heat for 35-40 minutes. Unwrap for the last 10 minutes to achieve golden color.