 Pin it
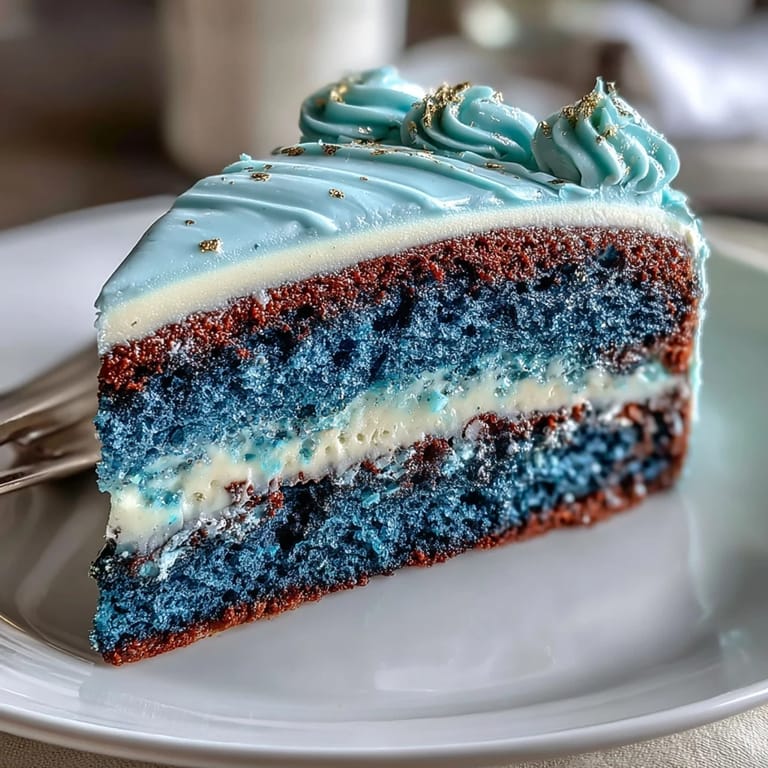
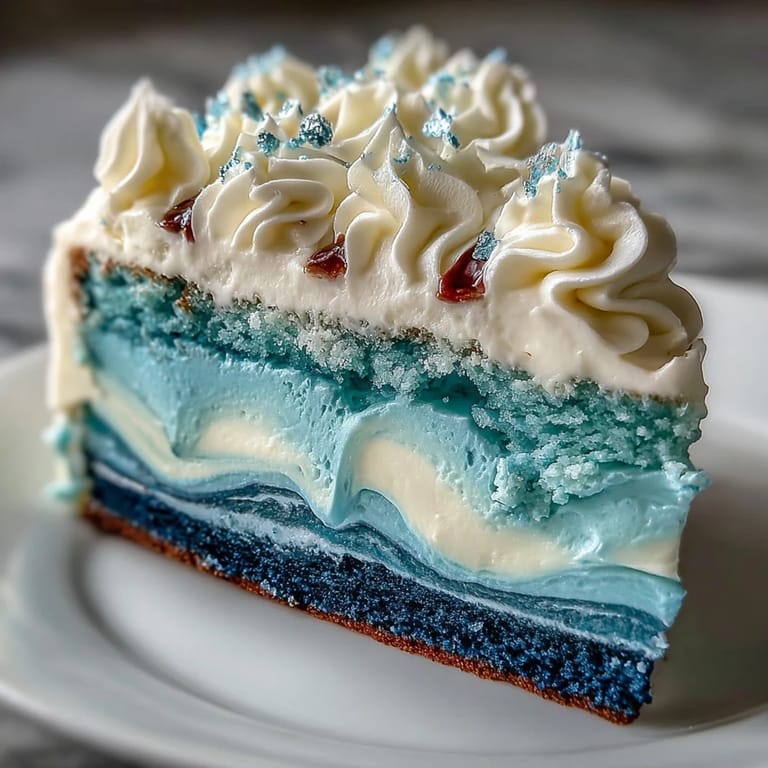
 The house filled with anticipation and the faint hum of celebration when I first set out to make this graduation cake. My timer beeped every few minutes as I darted between mixing bowls, blue food coloring trailing across my fingertips like little badges of honor. The scent of vanilla danced through the kitchen, lingering long after the layers were cool. There's something bold and magnetic about watching the deep blues blend into gold, as if the cake has a life of its own. I never realized how an ombre cake could feel thrilling until those first brush strokes of gold scattered along buttery swirls.
The first time I baked this cake for my nephew's graduation, we were all scrambling to finish decorations while the layers cooled in the corner. Someone joked about the kitchen looking like a superhero headquarters, blue dyes everywhere and tiny edible gold flakes drifting onto the countertop. We gathered around as I stacked each layer, laughing at the uneven frosting and sneaking tastes of extra buttercream. Hearing their proud voices made even minor mishaps feel like happy accidents. This cake became part of the graduation story, tucked between speeches and cheers.
Ingredients
- All-purpose flour: Get the fluffiest crumb by sifting before measuring—especially in celebratory cakes like this.
- Baking powder and soda: The cake rises evenly and holds its shape—never skip either, or your layers will be dense.
- Unsalted butter: Room temperature butter makes the mixing smooth, avoiding streaks or lumps in your batter.
- Granulated sugar: Helps achieve a tender but sturdy crumb, so the cake stands tall for layering.
- Eggs: Add one at a time, letting each emulsify—this is how you avoid curdling.
- Pure vanilla extract: More than aroma, it deepens the flavor and balances the sweetness.
- Whole milk: Room temp milk ensures a cohesive batter and prevents the butter from seizing.
- Blue gel food coloring: Use navy, royal, and light blue for stunning ombre layers—gel colors give the most vivid shades.
- Powdered sugar: Sift to prevent clumps in your buttercream, making it silky and easy to spread.
- Dark blue gel food coloring: For the deep outer layer, add gradually and tastefully—blend for an elegant finish.
- Edible gold leaf or gold dust: Edible varieties only! Handle gently for crisp accents, and use clear alcohol for gold dust.
Tired of Takeout? 🥡
Get 10 meals you can make faster than delivery arrives. Seriously.
One email. No spam. Unsubscribe anytime.
Instructions
- Prep the pans:
- Grease and line three 8-inch pans with parchment and set them out; pressing parchment snugly makes unmolding a breeze.
- Mix the dry ingredients:
- Combine flour, baking powder, soda, and salt; whisk till even, hearing the rush of particles slip over each other.
- Beat butter and sugar:
- Let the mixer do the work—about 3–4 minutes—until the mixture turns pale and fluffy like clouds.
- Incorporate eggs and vanilla:
- The addition of eggs softens the batter; pause between eggs to keep things smooth and creamy.
- Alternate flour and milk:
- Begin and end with flour, gently folding so the mixture stays light; feel the batter turn velvety beneath your spatula.
- Color the batter:
- Divide the batter evenly and add blue gel coloring to each, aiming for a gradual shift from light to dark in each bowl.
- Bake and cool:
- Fill each pan, smoothing the tops, and bake till the layers spring back and a tester comes out clean; cool before assembling.
- Buttercream time:
- Beat butter until creamy, then add powdered sugar bit by bit; vanilla, salt, and milk bring it all together like a velvet ribbon.
- Tint and reserve:
- Set aside some buttercream for crumb coating, and tint the rest deep blue for the outer shell.
- Layer and assemble:
- Stack layers from darkest to lightest, spreading buttercream between; keep edges smooth and level for that striking ombre look.
- Crumb coat:
- Apply a thin layer to seal crumbs, then chill so the cake sets before the final frosting.
- Final frosting:
- Frost with dark blue buttercream and blend lighter tones near the top; use a turntable for easier smoothing if you have one.
- Add gold accents:
- Gently press edible gold leaf or brush gold dust mixed with clear alcohol onto the cake, creating shimmering streaks or edges.
- Chill and serve:
- Let the decorated cake chill until party time; each slice reveals a surprise ombre effect.
 Pin it
 When the cake was finally done and ready, everyone paused just before cutting into it; even the graduate's friends snapped pictures for their feeds. It was a moment where the cake's blue and gold layers became more than a dessert—they felt like the centerpiece of the celebration. I saw smiles stretch as slices were handed out, each layer marking a milestone. The shimmer of gold was almost symbolic, hinting at the future ahead. I still smile remembering the cheers and the sticky blue fingers.
How to Perfect Your Ombre Layers
Don't be afraid to test the colors on a spoon before tinting the whole bowl—gel coloring is strong and a little goes a long way. Blending the colors gently with a spatula lets you avoid streaky batter, giving you clean gradients when you slice. If you want a more dramatic ombre, try adding a fourth shade or a hint of turquoise for depth. Use piping bags if you like sharper transitions, but I usually let the layers flow together. Remember to scrape the sides of bowls well so no pockets of color sneak into finished layers.
Gold Accents Without Stress
Edible gold leaf is delicate—clingy in humidity and brittle in cool air—so take your time. Using tweezers makes placement easier, and brushing gold dust with alcohol creates painterly streaks for extra drama. Small mistakes are easy to hide under an extra swipe of buttercream. If you run out of gold, chocolate stars or metallic sprinkles work in a pinch. The true celebration is making the cake your own with whatever sparkly touches you have on hand.
Last Minute Graduation Cake Assembly Advice
Stacking the layers was always the most nerve-wracking part: If your cake isn't level, just trim gently using a serrated knife. Frosting gets easier if you chill the crumb coat first, which stops the blue buttercream from picking up stray crumbs. I still double-check that gold decorations are edible—you don't want surprises on graduation day.
- Keep spare buttercream handy for patching any rough edges.
- Let kids help with gold accents—they never fail to make it fun.
- Chill the finished cake at least 30 minutes before slicing to keep layers sharp.
 Pin it
 There's something magical about serving a cake that shines as bright as the graduate's smile. Don't be surprised if requests for your ombre cake become the tradition at every celebration.
Recipe FAQs
- → How do I achieve the blue ombre effect?
Divide cake batter into separate bowls and tint each with different blue shades before baking for a gradient look.
- → What tools help with smooth buttercream frosting?
An offset spatula and cake turntable provide stability and control, ensuring an even and professional finish.
- → How should gold decorations be applied?
Use edible gold leaf or dust, brushing gently onto the frosted cake for striking streaks or edges.
- → Can I use additional layers for a dramatic effect?
Yes, adding more cake layers with increasing blue intensity enhances the visual ombre impact.
- → What are suitable graduation toppers?
Chocolate stars, themed figurines, or fresh berries add festive flair and personalize the cake.
- → What allergens are present?
This dessert contains wheat, eggs, and milk; some gold decorations may carry extra allergens—check labels.