 Pin it
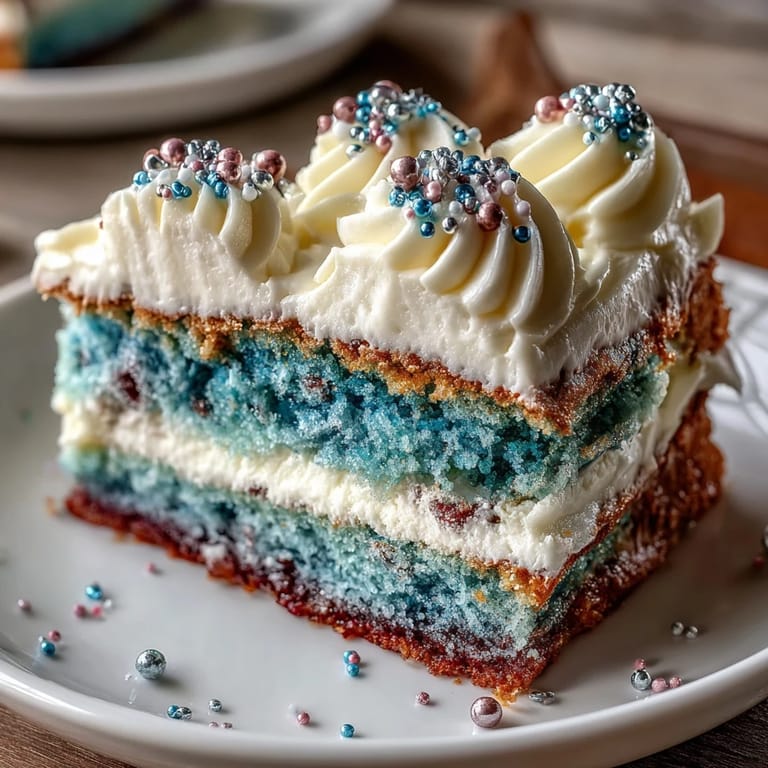
 My sister called me in a panic two weeks before her graduation, asking if I could make something that felt as big and bright as her accomplishments. She wanted a cake that looked like the night sky, and honestly, I almost talked her into something simpler. But then I started thinking about all those late-night study sessions she'd powered through, and suddenly a galaxy cake didn't feel like too much at all. This cake became my love letter to her milestone, and now whenever someone celebrates, this is the one they ask for.
I'll never forget setting up my kitchen like mission control, with food coloring bottles lined up like little soldiers and three cake pans ready to go. My roommate walked in, saw the setup, and asked if I was training to be a NASA engineer. By the end of the day, there was powdered sugar on every surface, and I'd somehow gotten edible glitter in places I didn't know existed, but the moment my sister walked in and gasped—that made every bit of it worth it.
Ingredients
- All-purpose flour (2 ½ cups): This is your cake's foundation, so don't skip sifting it if you want a tender crumb—lumps are the enemy of a delicate texture.
- Granulated sugar (2 cups): Creaming this with butter is where the magic starts, creating tiny air pockets that make the cake light and fluffy.
- Unsalted butter (1 cup for cake, 1 ½ cups for buttercream): Room temperature butter whips up beautifully, but cold butter will fight you—I learned this the hard way on my first attempt.
- Eggs (4 large, room temperature): Cold eggs won't incorporate smoothly, so pull them out of the fridge while you prep everything else.
- Whole milk (1 cup for cake, ¼ cup for buttercream): Room temperature milk blends seamlessly into the batter without shocking the temperature.
- Baking powder (2 ½ tsp): This gives the cake its lift, so measure carefully—too much and it tastes metallic, too little and you'll have dense layers.
- Vanilla extract (1 tbsp for cake, 2 tsp for buttercream): Use real vanilla if you can; the flavor difference is noticeable and worth it.
- Gel food coloring (black, navy blue, purple, pink, teal): Gel colors are more concentrated than liquid, so they won't thin out your buttercream like food coloring would.
- Powdered sugar (5 cups, sifted): Sifting removes lumps that can make your frosting grainy—it takes an extra minute but saves you from gritty buttercream.
- Edible gold and silver star sprinkles: These are what transform your cake from pretty to absolutely show-stopping, so don't skip them.
Tired of Takeout? 🥡
Get 10 meals you can make faster than delivery arrives. Seriously.
One email. No spam. Unsubscribe anytime.
Instructions
- Prep your pans and heat your oven:
- Preheat to 350°F and grease three 8-inch round pans, lining them with parchment paper so the cakes slide out without sticking. Having everything ready before you start mixing is the difference between a smooth baking session and frantic scrambling.
- Cream butter and sugar into clouds:
- Beat them together until the mixture is pale, fluffy, and looks almost mousse-like—this usually takes 3-4 minutes with an electric mixer. This step is crucial because you're incorporating air that will make your cake rise beautifully.
- Add eggs one at a time with patience:
- Drop in one egg, beat until fully combined, then repeat with the remaining three—rushing this step means you might end up with a grainy batter. After each egg, the mixture will look slightly broken, but keep going; it comes together once you add the dry ingredients.
- Combine dry and wet in a gentle dance:
- Whisk together flour, baking powder, and salt in one bowl. Add the dry mixture to your wet mixture in three parts, alternating with milk and always starting and ending with flour, mixing just until combined. Over-mixing develops gluten and makes the cake tough, so stop as soon as you don't see streaks of flour.
- Divide and bake with faith:
- Split the batter evenly among your prepared pans and bake for 30-35 minutes until a toothpick inserted in the center comes out clean or with just a few moist crumbs. The kitchen will smell absolutely incredible, but resist the urge to open the oven constantly—you'll let heat escape.
- Cool with purpose:
- Let the cakes rest in their pans for 10 minutes to set slightly, then turn them out onto wire racks to cool completely before frosting. A warm cake will melt your buttercream, so patience here is essential.
- Whip buttercream until it's pillowy:
- Start with softened butter beaten until creamy, then gradually add sifted powdered sugar while beating, alternating with milk and vanilla until the mixture is light and fluffy, about 3-4 minutes. If it looks too stiff, add a tiny splash of milk; if it's too soft, add a bit more powdered sugar.
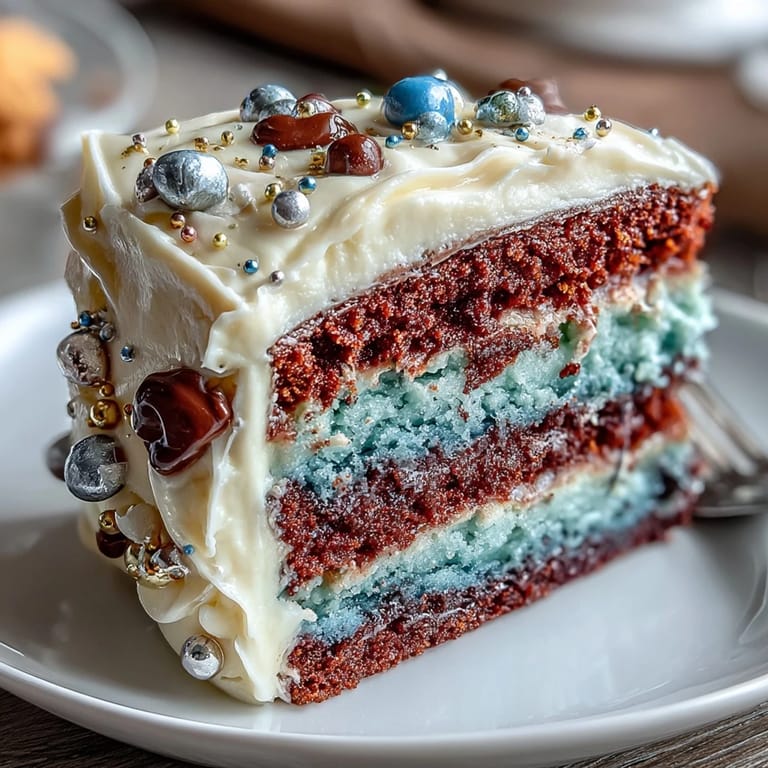
- Create your galaxy colors:
- Divide the buttercream into bowls and tint each with gel coloring—black, navy blue, purple, pink, and teal—remembering that colors darken as they sit, so go slightly lighter than you think you want. Mix thoroughly so there are no streaks of color.
- Form the marbled buttercream log:
- Place random spoonfuls of each color onto plastic wrap, roll into a log, and snip one end to pipe straight into a piping bag with a large round tip. This technique lets you pipe all the galaxy colors at once without switching bags constantly.
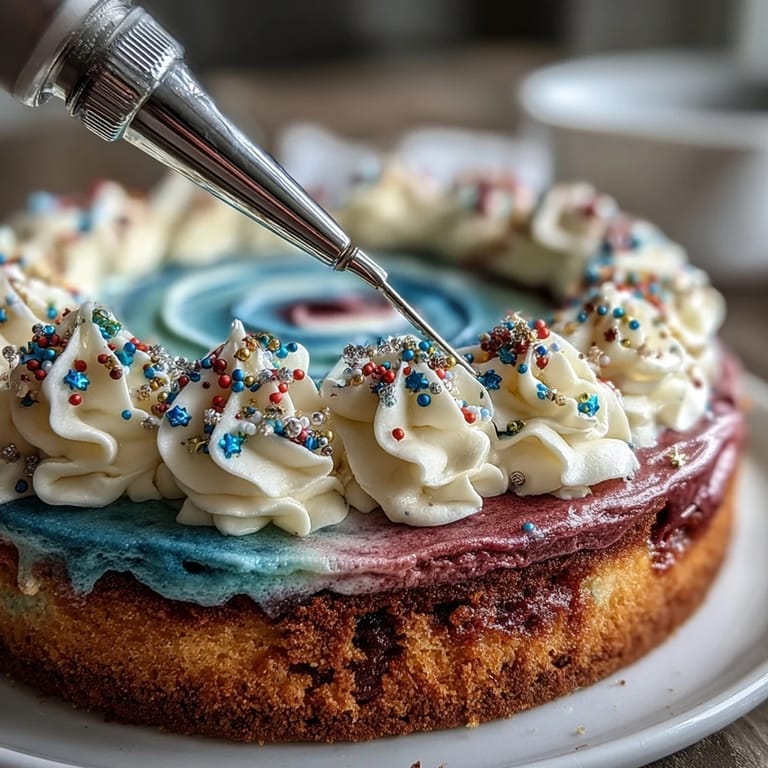
- Layer and crumb coat:
- Place one cake layer on your serving plate, spread a thin layer of galaxy buttercream, and repeat with remaining layers, then apply a thin crumb coat all over the cake. Chill for 20 minutes so this base layer sets and prevents crumbs from mixing into your final frosting.
- Pipe and swirl into the galaxy:
- Pipe the rainbow buttercream log in a spiral pattern from the center outward, then use an offset spatula to gently swirl and blend the colors into a marbled galaxy effect. Work slowly and don't overblend—some color separation is what makes it look cosmic.
- Paint on your stars:
- Mix white gel coloring with a tiny bit of water to make a paintable consistency, then use a food-safe paintbrush or splatter tool to flick or paint stars across the cake surface. Let these dry for a minute before adding sprinkles so they don't smudge.
- Finish with sparkle:
- Sprinkle edible gold and silver star sprinkles generously around the cake, then dust with edible glitter or luster dust for a shimmering effect. A graduation cap topper on top adds the perfect festive finishing touch.
 Pin it
 The night before the graduation party, I was looking at the finished cake in my fridge, and it hit me that I wasn't just making dessert—I was creating a memory that would outlast the taste. My sister told me later that every time her classmates talked about the graduation, they mentioned the galaxy cake, like it had become part of the story of that day. That's when I realized this recipe was about so much more than buttercream and edible stars.
The Science of Swirls
The magic of the galaxy effect comes from how buttercream colors blend without fully mixing. When you swirl the colors together gently, you create those beautiful nebula-like patterns that look intentional but feel organic. The key is knowing when to stop—over-swirling turns your galaxy into muddy gray, so practice restraint and trust the colors to do their own thing.
Timing and Temperature Matter
I used to rush straight from cooling to frosting and wondered why my buttercream would slide around. Then I learned that a crumb coat—a thin base layer that you chill—acts like an anchor for everything else. The twenty-minute chill seems like forever when you're excited to decorate, but it's the difference between a polished cake and one that looks like it's melting.
Customization and Celebration Ideas
This cake is endlessly adaptable, so don't feel locked into the exact colors I used. For a birthday, try softer pastels like lavender and blush pink; for a promotion, go with deeper jewel tones. You can also add jam between layers for extra flavor—raspberry or blueberry turns this into something elevated. Consider what the occasion means and let that guide your color choices.
- Layer in raspberry or blueberry jam between cake layers to add fruity brightness and moisture.
- Experiment with different gel color combinations like forest green and silver for a more mysterious galaxy, or warm golds and oranges for a sunset theme.
- Make this cake 1-2 days ahead, storing it uncovered in the fridge so the frosting firms up and holds its shape beautifully.
 Pin it
 This cake has a way of turning ordinary celebrations into something magical. Whether it's a graduation, promotion, birthday, or just a Tuesday that needs some sparkle, the galaxy cake reminds us that the people we're celebrating deserve something as extraordinary as they are.
Recipe FAQs
- → How do I achieve the marbled galaxy buttercream effect?
Tint separate buttercream portions with vibrant gel colors, place spoonfuls on plastic wrap, roll into a log, and pipe evenly. Swirl gently with a spatula to enhance the marbled galaxy appearance.
- → What is the best way to apply edible stars and glitter?
Use a food-safe paintbrush or splatter tool to flick white gel food coloring as stars, then sprinkle edible gold and silver star sprinkles and glitter for added shimmer.
- → Can I add extra flavor to the layers?
Yes, spreading raspberry or blueberry jam between the cake layers adds a fruity contrast that complements the galaxy design.
- → What tools are essential for decorating this dessert?
An electric mixer for batter and frosting, piping bags with round tips, an offset spatula for smoothing, and a food-safe paintbrush or splatter tool for star effects are recommended.
- → How do I ensure vibrant galaxy colors?
Use high-quality gel food coloring and apply colors carefully during buttercream preparation to achieve vivid, lasting hues.